7 Easy Tactics for Better Coastal Landscape Photography
Introduction
Coastal landscape photography offers some of the most stunning scenes imaginable, from dramatic skies to powerful waves crashing against the shore. However, capturing these moments isn't always easy due to challenges like changing weather, sea spray, and lighting conditions. Whether you’re an amateur or an experienced photographer, mastering the right techniques can elevate your coastal shots to a professional level.
In this article, we'll explore seven essential tips that cover everything from gear selection to timing and composition. By the end, you’ll be better equipped to capture breathtaking coastal landscapes, no matter where you are.
1. Be There at the Right Time
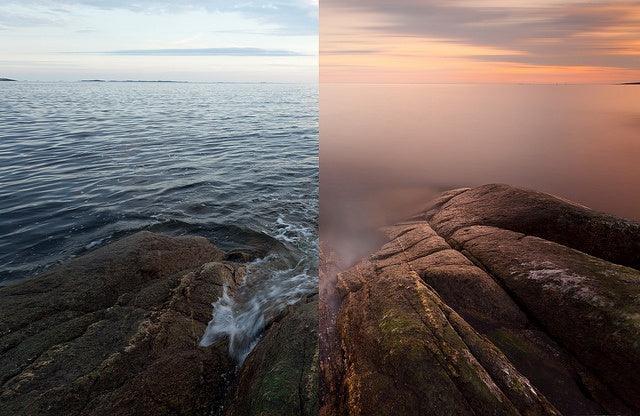
Golden Hour Photography
The golden hour is a favorite among landscape photographers, and coastal scenes are no exception. This period occurs shortly after sunrise and just before sunset, when the sunlight is soft and golden, creating a beautiful glow across the horizon and water. The low angle of the sun helps create long shadows, rich colors, and a natural warmth that enhances any seascape.
If you want your coastal photos to have a dreamy, golden tone, make sure to schedule your shoots during these early morning or late afternoon hours. The results are especially stunning when combined with the movement of water and the natural textures of the coast.
Blue Hour Photography
Following the golden hour comes the blue hour, which occurs just before sunrise and after sunset. During this time, the sun is below the horizon, and the sky takes on a deep blue color that creates a mysterious, almost surreal atmosphere. While the lighting is dim, the world is bathed in soft, cool tones that lend themselves beautifully to coastal photography.
The blue hour works particularly well for long-exposure shots, where you can capture smooth, silky water movements and subtle details. This low-light condition can be challenging to shoot in, but with the right settings, you’ll end up with ethereal and dramatic results.
Avoiding Harsh Midday Light
While coastal photography can be done at any time, midday is often the least ideal. The sun at this time is high and harsh, casting unflattering, hard shadows and often overexposing key elements in your scene. The colors can appear washed out, and reflections on the water may be too intense, leading to a flat, unappealing image.
If you find yourself shooting at midday, consider overcast days, as they offer softer light and a more even exposure. However, to capture coastal scenes in their best light, stick to early morning or late evening shooting times whenever possible.
2. Use a Tripod (and Reduce Vibrations)
Importance of Stability in Low Light
Shooting during the golden or blue hours means you’ll often be working in lower light conditions, where hand-holding your camera could result in blurry images. A tripod is crucial to stabilize your camera, especially when you use longer shutter speeds to capture the smooth movement of water. This is particularly important when aiming for sharp, high-quality images.
Choose a sturdy tripod that can withstand coastal elements like wind and sea spray. Lightweight tripods may be convenient, but they won’t provide the necessary stability in such environments, leading to unwanted vibrations.
Additional Methods to Reduce Vibration
Aside from using a tripod, there are additional techniques you can use to minimize camera shake. Using Live View or shooting with a mirrorless camera can help reduce internal vibrations caused by a traditional DSLR’s mirror mechanism. These vibrations, though small, can make a difference in the sharpness of your image, especially during long exposures.
Additionally, instead of manually pressing the shutter button, use a remote shutter release or your camera’s built-in timer. This prevents even the slightest motion that could occur when you press the button, helping you avoid any unintentional blurring.

Whether you choose a simple or more advanced remote shutter release, you’ll find the right one for your Canon, Nikon, Fuji, Sony, Panasonic, Olympus, or Pentax camera on Amazon.
3. Get the Right Filters
Neutral Density (ND) Filters for Long Exposures
ND filters are invaluable for coastal landscape photography. They reduce the amount of light entering the camera, allowing you to use slower shutter speeds even in bright conditions. This is particularly useful when you want to capture the motion of water in a smooth, misty way, but still need to maintain a proper exposure.
For example, an ND filter can help extend your exposure time from 1/1000th of a second to several seconds or more, creating a beautiful effect with flowing water or moving clouds. There are different strengths of ND filters, so experiment to find the one that works best for your desired effect.
Polarizing Filters for Reflections and Color Saturation
A circular polarizer is another key accessory for coastal photography. It helps reduce glare from the water’s surface, making rocks, waves, and other textures stand out. It also enhances colors, deepening the blues of the sky and the greens in your landscape, resulting in more vibrant and dramatic photos.
Keep in mind that a polarizer’s effect varies depending on the angle of the sun, so it’s worth experimenting with different orientations to see the impact on reflections and color saturation.
Graduated ND Filters for Balancing Exposure
Graduated ND filters are useful when you have a bright sky and a darker foreground, which is common in coastal scenes. The top part of the filter is darker, helping to block out some of the light from the sky, while the bottom part is clear, allowing the foreground to be exposed correctly.
This allows you to capture a well-balanced image where both the sky and the landscape are properly exposed. While some photographers prefer to blend multiple exposures in post-processing, using a graduated ND filter can save time and simplify your shooting process.
4. Include Foreground Interest
Importance of Engaging Compositions
Coastal landscapes often boast vast horizons and dramatic skies, but to create truly engaging photographs, it’s crucial to include elements in the foreground that capture the viewer's attention and lead them into the image. This adds depth and a sense of scale to your shots, making them more dynamic and visually interesting.
Without foreground interest, your photo can feel flat and lacking in depth, even if the sky or water is stunning. By adding a compelling object, such as a group of wet rocks, driftwood, or sand patterns, you provide a point of reference that invites viewers into the scene.
Techniques for Capturing Foreground Interest
Incorporating foreground elements doesn’t mean you need to compromise on your background. In fact, foreground elements enhance the overall composition. Arrive early at your location and take the time to scout for potential objects to include in the frame. Rocks, shells, and patterns in the sand are natural choices, especially if they lead the eye toward the main subject.
To emphasize foreground interest, try getting low to the ground and close to your chosen element. This technique makes the foreground object appear more prominent in the frame, creating a strong sense of depth and perspective. However, be mindful of environmental hazards like waves that might damage your equipment!
5. Experiment with Different Shutter Speeds
Capturing Water Movement
One of the most exciting aspects of coastal photography is the ability to capture the movement of water. The appearance of water in your photos can vary dramatically depending on the shutter speed you use. A faster shutter speed, such as 1/1000th of a second, can freeze the motion, revealing every ripple and splash in crisp detail.

On the other hand, slower shutter speeds—anywhere from 1/10th of a second to several minutes—can create a silky, flowing effect that turns crashing waves into smooth, misty streaks. This effect gives your images an ethereal, dreamlike quality. Experiment with different shutter speeds to find the look that best suits the mood of your scene.

Shutter Speed and Exposure Balance
It’s important to remember that adjusting your shutter speed will also affect the exposure of your image. A slower shutter speed lets in more light, potentially overexposing your shot, especially in bright daylight. To balance this, you may need to adjust your aperture and ISO settings. Narrowing your aperture (higher f-stop) reduces the amount of light, while lowering your ISO minimizes sensor sensitivity.
If you're shooting in bright conditions and want to use a long shutter speed, an ND filter, as discussed earlier, is essential. It reduces the overall light hitting your sensor, allowing for slower exposures without overexposing the image.
6. Try a Black-and-White Conversion
Why Go Black-and-White?
Coastal landscapes are often celebrated for their vibrant colors—golden sunsets, blue skies, and the shimmering tones of the sea. However, a black-and-white conversion can create stunning images that emphasize texture, contrast, and mood. In monochrome, the patterns of waves, rocks, and clouds take on a more dramatic quality, often creating a sense of timelessness and mystery.
Black-and-white photography works particularly well when the sky is overcast, or when the scene lacks the bold colors typically seen at sunrise or sunset. Stripping away color focuses attention on the shapes, lines, and textures in the scene, offering a fresh perspective on familiar landscapes.

Techniques for Post-Processing Black-and-White Photos
Modern editing software makes it easy to convert any color image to black-and-white after the fact. Once you’ve imported your images into programs like Adobe Lightroom or Photoshop, you can experiment with different levels of contrast, brightness, and texture to bring out the best in your black-and-white conversion.
Remember, a strong monochrome image often relies on pronounced contrasts between light and dark areas. Make adjustments that emphasize the interplay between the sky, water, and land to create a photo with maximum impact.
7. Turn Around and Explore Different Angles
Don’t Just Shoot Towards the Sun
When you’re shooting coastal landscapes, especially during sunrise or sunset, it’s easy to get caught up in focusing your camera toward the sun. After all, the colors and lighting in that direction can be breathtaking. However, some of the best photo opportunities might actually be behind you or to your sides.
As the sun rises or sets, the light can cast stunning reflections or shadows on the landscape, creating dramatic and beautiful scenes. Clouds, rocks, and even waves can be illuminated in ways that offer unique angles and compositions that other photographers might miss by focusing solely on the sun.

How to Explore Different Perspectives
Always take a moment to pause and look around your environment before and during your shoot. Check the way the light interacts with different elements in the landscape. For instance, clouds opposite the sun may take on a beautiful pink hue as the sun sets, or reflections in tidal pools may mirror the sky in an interesting way.
This tip is especially valuable in popular photography spots, where everyone may be pointing their camera in one direction. By exploring different perspectives, you can find fresh angles that make your coastal photos stand out from the crowd.
Conclusion
Coastal landscape photography is an art that requires patience, the right gear, and a keen eye for lighting and composition. By following the seven tactics outlined in this article, you’ll be able to capture stunning images that showcase the beauty and power of the coast. From choosing the right time of day to experimenting with shutter speeds and using filters, each tip will help you refine your technique and improve your results.
So next time you head out to the coast with your camera, remember these tips: plan your shoot around golden or blue hour, bring a sturdy tripod and filters, look for engaging foreground elements, and always be willing to experiment. With practice and persistence, you’ll be able to produce breathtaking coastal landscapes that capture the essence of the sea.
FAQs
1. What is the best time of day for coastal landscape photography?
The best time for coastal landscape photography is during the golden hour (shortly after sunrise or just before sunset) and the blue hour (just before sunrise and after sunset). These times offer soft, flattering light that enhances the natural beauty of the scene.
2. Why do I need a tripod for coastal photography?
A tripod is essential for coastal photography, especially in low light conditions during the golden or blue hour. It provides stability, allowing you to use slower shutter speeds without introducing blur from camera shake.
3. How do I use a neutral density (ND) filter?
ND filters reduce the amount of light hitting your camera sensor, which allows you to use longer shutter speeds even in bright conditions. This is especially useful for capturing smooth, flowing water effects.
4. What is the benefit of including foreground elements in my shots?
Adding foreground elements like rocks, waves, or sand patterns creates depth and visual interest in your composition, making the viewer feel more immersed in the scene.
5. How can I capture long-exposure effects in coastal photography?
To capture long-exposure effects, set your camera to a slow shutter speed, use a tripod to keep your camera stable, and consider using an ND filter to control the light. This technique allows you to capture smooth, flowing water or clouds in motion.